E-Scouting · By Josh Forcier · 6 min read · Updated 2026-10-05
How to Narrow Down a Large Area When E-Scouting for Elk
Turn a big public land unit into three to five places worth checking on foot, in three passes on the map. Includes the Read the Ridge video and transcript.
To narrow down a large area for elk, work in passes. Set aside ground that is an easy walk from a road, keep what a road cannot see, and then look for clusters of useful terrain where those two overlap. You should finish with three to five places you can check on foot.
When I look at a big public land unit, my goal is simple: turn a huge area into three to five realistic places I can hunt. I rotate between Colorado, Wyoming and Montana, and following this has put me in range of elk every year. I am not trying to find elk from the couch. I am trying to remove bad country, find realistic access, and spend my limited time in the highest probability spots.
Watch: Read the Ridge, Episode 1
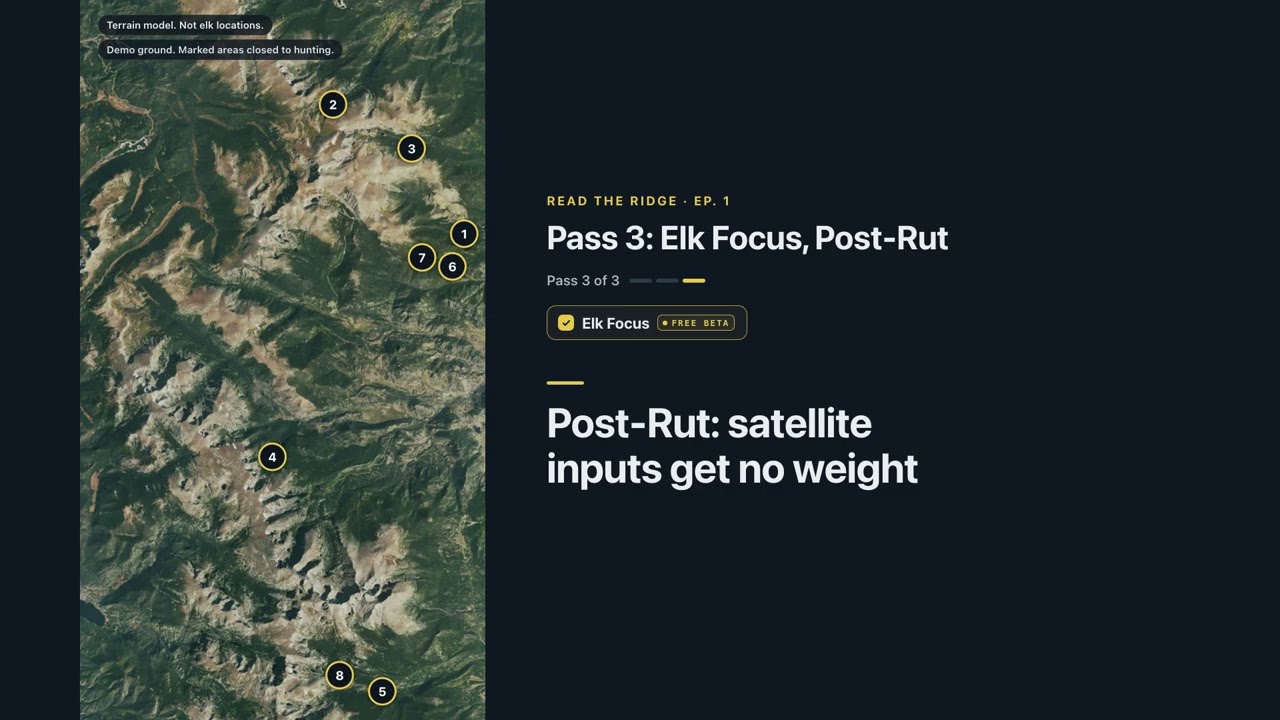
The ground on screen is not named, and the marked areas sit on ground closed to hunting. The video is narrated by a computer-generated voice. Its third pass uses Elk Focus, which is not currently offered; this page shows how to do that pass by hand.
- 0:00 Too much ground
- 0:20 Ground rules
- 0:45 Three passes
- 1:02 Pass 1: Access Difficulty
- 1:55 Pass 2: Hidden from Roads
- 2:43 Pass 3: Elk Focus, post-rut
- 3:59 The short list, then on foot
- 4:59 Try it on your own ground
Transcript
Read the Ridge, episode one. How to narrow down a large area. This video is narrated by a computer-generated voice.
This view covers about four hundred thirty square miles. You can’t walk all of it before the season. Here’s how to cut it down to a couple of places worth walking.
Read the Ridge teaches one e-scouting skill per episode. The ground on screen is a backdrop, and it isn’t named. The areas marked later in this video sit on ground that’s closed to hunting. That way, nobody’s hunting spot ends up in a video. Everything on the map is a terrain model. It doesn’t show elk. These layers aren’t personalized, either. Anyone with access sees the same layers.
Here’s the plan. Pass one sets aside ground that’s easy to reach from a road. Pass two keeps what a road can’t see. Pass three runs Elk Focus on the same view and checks where its short list lands against the other two. What’s left is a short list of places to check on foot.
Pass one is Access Difficulty.
It scores two things: the straight-line distance to the nearest mapped motorized road, and how hard the walk in and back out would be. That covers the climbing, and the brush and timber along the way. Mapped trails make the walk easier.
There are five levels, from Easy to Extreme. Light teal is easy. Dark teal is hard. Extreme takes a mile or more from a road, plus hard ground on the way in. A long, flat walk won’t get there.
It assumes there’s no snow, and private roads count as roads. It measures effort. It doesn’t tell you what’s legal to cross, or how many people go there.
Set aside Easy and Moderate, and work with what’s left. It’s shown on shaded relief here. On satellite, the teal blends into the timber.
Pass two is Hidden from Roads.
Of the ground that’s left, what can’t be seen from a road? Purple means the model found no line of sight from anywhere within one hundred yards of a mapped road. It looks out three miles, from about eye height. Ground farther than three miles out counts as hidden too.
It’s terrain alone. Trees aren’t in the model, so timber can hide ground this layer calls visible. It also looks from roads and nowhere else. Hunters on trails can still see purple ground.
That gap through the middle is the road and the valleys it looks into. Seasonal and private roads count, so check which roads are open in your season. The big purple blocks are the ground you keep.
Turn both passes on together. The app stripes the overlap in purple and teal. Where the teal stripe is dark, it’s a hard walk in, and the road can’t see it. That’s the ground to work from.
Pass three is Elk Focus. It’s a beta layer for Colorado.
Run it on the same view. Colorado’s rifle seasons run from mid October to late November, so the season here is set to post-rut.
Elk Focus ranks ground using terrain, land cover, water and distance from roads. It adds Colorado Parks and Wildlife’s mapped elk range and migration corridors. It also reads recent satellite vegetation and burn recovery. In post-rut, neither gets any weight, because the imagery is from August. It takes nothing from passes one and two. It ranks ground three quarters of a mile or more from a mapped road, and nothing closer.
The numbers are its short list for the view it ran on. It returns up to ten areas and never pads the list. This view came back with eight. It ranks habitat against other habitat. It can’t tell you where elk are today, and everyone who opens it sees the same model.
Elk Focus doesn’t know this ground is closed to hunting. It sees mapped public land. Land status and regulations are yours to check.
Here are the eight against the purple. All eight land inside it or right at its edge.
Now put the passes together. Move in closer. Five of the eight cluster in one purple pocket, so start there.
On pass one, the same pocket reads dark teal. That’s a hard walk in.
Here are two of them up close. You can see the ranked patches along the edge of the timber. That’s the grid Elk Focus ranks. Both sit where timber meets open ground, with feed next to cover. Check the timber side for beds, and the open side for feeding sign.
From here, the checking happens on foot. On your own ground, look for fresh sign, like tracks, beds and droppings. Check the water, because mapped water can be dry. See whether the timber really screens the spot from the road and the trails. Find where the hard walk actually starts, and check current road and gate status. Snow changes the walk, and the access layer assumes there’s none.
Elk Focus is free during the Colorado beta. Access Difficulty and Hidden from Roads are Pro layers. The link in the description opens Elk Focus. Pick your Colorado unit and set the season to post-rut to match this video. Coverage by state is in the description. [Update: Elk Focus is not currently offered.]
Free accounts can try each Pro layer for one minute.
Want this run on your own ground, privately? The email is in the description. Comment the skill you want next, not your spot. Next episode: how to find pressured elk.
Start broad: the unit, the land and the season
Pick the unit or general area, then make sure you understand what is public and which season you are hunting. Rut, post-rut and late season can each point you toward different terrain.
Use terrain analysis to find the elevation, slope and aspect that fit your season. For a late season hunt I might select slopes under 20 degrees, elevations from 7,000 to 8,500 feet, and northwest, west, southwest, south, southeast and east aspects. The right numbers depend on the area and the weather.
Pass 1: set aside ground that is easy to reach
Next I look for the public ground with the fewest roads. A good baseline for me is roughly a mile from a road.
In RidgeRead this is the Access Difficulty layer. It scores two things: the straight-line distance to the nearest mapped motorized road, and how hard the walk in and back out would be, counting the climbing and the brush and timber along the way. Mapped trails make the walk easier. There are five levels, from Easy to Extreme. Extreme takes a mile or more from a road plus hard ground on the way in, so a long, flat walk will not reach it.
Set aside Easy and Moderate and work with what is left. Know the limits. The layer assumes there is no snow, private roads count as roads, and it measures effort. It does not tell you what is legal to cross or how many people go there.
Pass 2: keep what a road cannot see
Of the ground that is left, ask what cannot be seen from a road. The Hidden from Roads layer marks ground where the model found no line of sight from anywhere within 100 yards of a mapped road. It looks out three miles from about eye height, and ground farther than three miles from a road counts as hidden too.
It is terrain alone. Trees are not in the model, so timber can hide ground this layer calls visible. It also looks from roads and nowhere else, so hunters on trails can still see hidden ground. Seasonal and private roads count, so check which roads are open in your season.
Where the two passes overlap
Turn both layers on together. Ground that is a hard walk in and out of sight of the road is the ground to work from. If there is a lot of it, I look for the spots I would least want to hike into and pick three to five of those areas.
Pass 3: look for clusters of useful terrain
Now move from the big picture to the details. Inside each area, look for clusters of useful terrain: connected benches, saddles, drainage heads, timber edges, burns and transition zones. Mark each feature on your map and look for places where several sit close together.
Edges where timber meets open ground put feed next to cover. Check the timber side for beds and the open side for feeding sign.
In the video, the third pass uses Elk Focus, a beta layer that ranked habitat for the season. Elk Focus is not currently offered, so do this pass by hand.
Build the short list
By the end I want a short list: a primary spot, a backup, a high pressure escape, a weather or late-day option, and glassing spots.
Then check it on foot
From here, the checking happens on foot. Look for fresh sign such as tracks, beds and droppings. Check the water, because mapped water can be dry. See whether the timber really screens the spot from the road and the trails. Find where the hard walk actually starts, and check current road and gate status. Snow changes the walk, and the access layer assumes there is none.
Everything on the map is a terrain model. It does not show elk, and land status and regulations are yours to check.
Which RidgeRead layers does this use?
Access Difficulty and Hidden from Roads are Pro layers, and coverage varies by state. Free accounts can try each Pro layer for one minute.